I CT For


Check 'Em!


My Blinkies!

Peaches Blog Train!

My Avatars (DO NOT SNAG)


Friday, January 31, 2014
*How To* Record and Run a Name Script
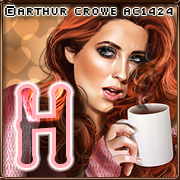
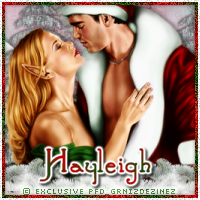
Today I will be showing you how I record and run a name script. First complete the tag you want to put the name on. I will be using the tag below as an example:

Next, select your text tool and choose the font, size & color you want the font to be. I am using "Rock It" font with size of 40 & the color is black. It will automatically be placed on the canvas as a vector layer. Once you've moved it where you want it to be, right click on the name layer in the layer palette and Convert to a Raster Layer.
Before we begin recording make sure your script toolbar is visible on your screen and placed where you like it. You can find that toolbar by going to View -> Toolbars and clicking on Script. I've placed mine here:
Also before we begin recording here a few tips: don't record if you plan on using the flood-fill tool. I've never gotten this to work properly for me...I would suggest using gradient glow instead. Also don't worry about making any mistakes...any undone steps will not be included in the final script.
If you're ready to start recording, go ahead and click on those double arrows at the end of the script toolbar and click on Start Script Recording. Anything you do from now until you click Save Script Recording will be recorded. First I am going to use the Eye Candy 4000 Glass plugin.

Next I will use Eye Candy 4000 Gradient Glow. (All of your current settings that are being used will be saved, you will not need to re-adjust even after changing them to something different).

Once you've done everything you want with the name and it's like you want the name to look like everytime you run the script, go ahead and click on those two little arrows like we did before on the script toolbar and click on Save Script Recording. Name your script, make sure you save it to your Restricted Scripts folder and click save.
When you want to run this script make sure you follow the same steps (type out the name, convert to a raster layer) then click on the drop down menu on your script toolbar, select the script you want to use and then click the play button (blue arrow). The script will stop at times when you have to press okay and you can change your settings if needed. Otherwise just click enter and watch the magic happen!
I hope this helps someone! If you have further questions, don't hesitate to contact me (mbalmerswifetuts@gmail.com)!
This tutorial was written by me, Ruinations by Hayleigh, on Jan 31, 2014. Any resemblance to another tut is strictly coincidental. Please do not claim this tutorial as your own!

Subscribe to:
Post Comments
(Atom)
About Me

- Hayleigh
- Oklahoma
- I'm a 30 year old SAHM to 3 adorable boys and newlywed to a wonderful husband. I've been using PSP for 9 years.
CU Licenses
Stamps

You Rock! :)
ReplyDelete