I CT For


Check 'Em!


My Blinkies!

Peaches Blog Train!

My Avatars (DO NOT SNAG)


Tuesday, April 30, 2013
Quick Cluster Frame


Sunday, April 28, 2013
New Offer Posted At Twilight Designs!
Here's an example of the offer I have posted at Twilight Designs. Click on the blinkie below the signature to go to the group where you can request it. *NOTE* Cafemom.com account required to request:


Tag ShowOff

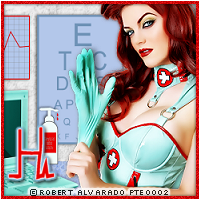
*Tutorial* PTU Angelic Garvey

This tutorial was written assuming you have a working knowledge of PSP. Any resemblance to this tutorial is purely coincidental.
:|: Tubes of choice :|: I used tubes by the fabulous Keith Garvey. I got them from MPT which is no longer in use but you can find Keith's tube store HERE. Please do not use his tubes without the proper license.
:|: Template :|: I used a collab template by Tonya & Minxy from the Creative Misfits Creations blog HERE.
:|: Scrapkit :|: I am using a fabulous PTU kit called Ascension by Designs By Sarah. You can purchase that kit HERE at Pimp My Tags With Scraps.
:|: Mask of Choice :|: I am using one from weescottslass; you can find that blog HERE.
:|: Filters Used :|: Eye Candy 4000-Gradient Glow, Pentacom-Dot&Cross
:|: Supplies :|: Download link HERE.
Ready to get started?
Open up the template from the supplies folder -- CTRL+D to duplicate, then close the original. Close off copyright & all wordart layers. Open sb_pmt_ascension_pp17 -- ctrl+C to copy and paste as a new layer above Shape 1 in your layer pallette -- resize as preferred & rename Shape 1 Paper. Activate the Shape 1 layer -- Selections -> Float -> Defloat -> Invert; activate paper layer -- Delete; close off Shape 1 layer. Repeat steps for the Shape 2 layer.
Activate Shape 1 Paper layer -- Effects -> Plugins -> Eye Candy 4000 -> Gradient Glow and use the following settings:


Add a dropshadow (I used the following settings: 1, -1, 75, 6.99 color=black). Repeat steps for Shape 2 Paper. Like it so far?
Activate the Thin Rectangle 1 layer; open sb_pmt_ascension_pp13 -- copy/paste above thin rectangle layer; resize and sharpen as preferred. Selections -> Float -> Defloat -> Invert; activate paper layer -- Delete; close off Thin Rectangle 1 layer. Repeat steps for the Thin Rectangle 2 layer. Add dropshadow to both thin rectangle paper layers.
Activate Rectangle layer; open sb_pmt_ascension_pp14 -- copy/paste above Rectangle layer; resize and sharpen. Selections -> Float -> Defloat -> Invert; activate paper layer -- Delete; close off Rectangle layer. Activate Rectangle Frame layer -- Selections -> Float -> Defloat -> Add New Raster Layer. Flood fill inside the ant lines with #90bdd1. Add dropshadow & close off original Rectangle Frame layer. Activate Stars layer -- Selections -> Float -> Defloat -> Add New Raster Layer. Flood fill the stars with #90bdd1; add previous gradient glow and close off original stars layer.
Activate Circle layer; open sb_pmt_ascension_pp8 -- copy/paste above Circle layer; resize and sharpen. Selections -> Float -> Defloat -> Invert; activate paper layer -- Delete; close off original Circle layer. Add gradient glow but change the white to #90bdd1. Add dropshadow (I used 0, 0, 75, 6.99 color=black). Close off Dotted Circle layer. Activate Rectangle Background layer -- Selections -> Float -> Defloat -> Add new raster layer; flood fill inside all the ant lines with #59678c. Add a dropshadow (I used 1, -1, 75, 6.99 color=black) and close off original Rectangle Background layer.
Open up a tube of choice to place in the two left hand rectangles. Using your magic wand (tolerance 40, feather 3) click inside the furthest of the left side rectangle. Copy/paste your tube (resize & sharpen as needed) and place what you want seen inside the ant lines. Selections -> Invert and delete the excess tube. Duplicate the tube layer. Change blend mode of duplicated tube to Soft Light. Change blend mode on original tube layer to Luminance (Legacy). Effects -> Texture Effects -> Blinds with these settings:

Activate the Rectangles Paper layer again; using the magic wand at the same settings click inside the rectangle directly to the left of the middle one. Paste your tube again and rearrange inside those ant lines. Selections -> Invert and delete excess tube. Duplicate the tube layer; change blend mode of duplicated tube layer to soft light. Activate original tube layer; change blend mode to Luminance (Legacy). Effects -> Plugins -> Pentacom -> Dot & Cross and use the following settings:

Now repeat those steps for the right two rectangles! Now open up a full-length tube of choice; copy/paste, resize and sharpen as needed. Position in the middle rectangle and add a dropshadow. I used wings from the kit, resized and placed behind my full tube so it looks like she has wings. Now for the elements!
Open up sb_pmt_ascension_flower 1, sb_pmt_ascension_button 1, sb_pmt_ascension_ribbon 5 and sb_pmt_ascension_bubble 1. Resize and sharpen as needed and position as shown on mine or whereever you like. Add a dropshadow (I used 1, -1, 75, 6.99 color=black) to all the elements opened. Now for the mask!
Open sb_pmt_ascension_pp13; copy/paste above background layer. Layers -> Load/Save Mask -> Load Mask from Disk. Choose WSL_Mask291 from the drop down menu with the settings: Source Luminance checked, Fit to Layer checked, Invert Transparency Unchecked. Merge the group; resize, sharpen & position as preferred. Add name & copyright, crop if needed and save as a .png file!
I'd love to see your creations; email me tags you make using my tutorial!
Thursday, April 25, 2013
Welcome To My Blog!
Hey and thanks for stopping by! My name is Hayleigh and I have been PSP-ing for around 3 years now. This blog will contain cluster freebies, tutorials and designs that I've done. Check back soon for my first tutorial and bear with me as I get this blog together. In the mean time look to the column on your left and check out some of the amazing blogs I have linked!

Subscribe to:
Posts
(Atom)
About Me

- Hayleigh
- Oklahoma
- I'm a 30 year old SAHM to 3 adorable boys and newlywed to a wonderful husband. I've been using PSP for 9 years.
CU Licenses

Stamps