I CT For


Check 'Em!


My Blinkies!

Peaches Blog Train!

My Avatars (DO NOT SNAG)


Wednesday, July 31, 2013
NEW CT Show-off Tag "Sultry"


I have an awesome new kit for you to check out today! It's called "Sultry" and is by the fabulous PinkParadox. It's full of great, sexy elements, frames & papers for your sexy or girly tags. You can purchase this kit now at PicsForDesign.
Sunday, July 28, 2013
CT Tag Show-off "Almost Famous"


Here's another CT Show-off tag featuring the great "Almost Famous" kit by PinkParadox! This kit is so awesome and is perfect for all your rocking tags! It has great hues of blue, pink and black and features all sorts of elements. Hurry into PicsForDesign today to purchase this kit!

Monday, July 22, 2013
CT Tag Showoff "Citrus"

Hey guys, I've got another CT tag to show-off a kit by the fabulous PinkParadox! This kit is called "Citrus" and features all sorts of fruits and flowers for summer/fall tags. This kit contains 120 elements, 10 frames & 20 papers. Head over to PicsForDesign to purchase this great kit now:

I love this kit!!
New CT Tag Showoff "Almost Famous"

Kit name is "Almost Famous" by the fabulous PinkParadox Productions. This kit is perfect for your rocker tags! This mega kit has 175 elements, 15 frames & 30 papers. The tube I used with the kit is called "Gloria" and is by the great VeryMany.
You may purchase this kit (and the tube) at PicsforDesign!! Here's a preview of the kit:

Be back with more later!
"Warrior Queen" FTU Cluster Frame
Hey guys! I've made a cluster frame using PinkParadox Productions "Warrior Queen" kit. Head over to 4shared to download and PicsForDesign to purchase this awesome kit. Here's a preview of the cluster:


And the download link found HERE at 4shared. Enjoy!
Sunday, July 21, 2013
New CT Tag "Warrior Goddess"

New CT tag "Warrior Goddess" made with kit by PinkParadox "Warrior Queen" and tube by VeryMany "Summer."
This kit is full of warrior filled things including big cats & swords; it has 145 elements, 10 frames & 20 papers. Stop by PicsForDesign to purchase this kit and the tube that matches so well.
Monday, July 15, 2013
CT PTU Tutorial "Mermaidia"

This tutorial was written assuming you have a working knowledge of PSP. This came from my imagination and any resemblance to another tutorial is coincidental.
Supplies Needed:
:|: Tube :|:
Mermaid Girl by Alex Prihodko
:|: Kit :|:
Fantasy Goddess by PinkParadox
:|: Template :|:
None
:|: Mask :|:
WSL_Mask105 by weescotslasscreations
:|: Fonts :|:
Victor's Pixel Font
Great Vibes
:|: Elements & Papers :|:
Fantasy Goddess-E61
Fantasy Goddess-E89
Fantasy Goddess-E97
Fantasy Goddess-E101
Fantasy Goddess-E102
Fantasy Goddess-E105
Fantasy Goddess-E110
Fantasy Goddess-E112
Fantasy Goddess-E113
Fantasy Goddess-E123
Fantasy Goddess-E124
Fantasy Goddess-E125
Fantasy Goddess-F12
Fantasy Goddess-P2
Fantasy Goddess-P11
Let's get started!!
Open up a new PSP project (700x700, transparent). C/P/R/S Fantasy Goddess-F12, duplicate, put them side by side and overlap them a little then merge them together. Take your magic wand and click inside each frame and expand by 3. C/P/R/S Fantasy Goddess-P2 above the frame layer, invert and delete excess paper. Activate the frame layer and place a dropshadow.
Now C/P/R/S your tube and place it in the middle of the two frames and add a dropshadow. Now open all your elements, c/p/r/s as preferred and place behind your tube layer as you want them placed or use my example as a reference. To get the sand I duplicated the sand element 3 times, merged them together and then deleted the sand that was not underneath the tube.
Now c/p Fantasy Goddess-P11 above the background layer and apply the mask to it. I merged the group containing the mask and then resized it behind one of the circle frames, then duplicated and positioned the second one behind the second circle frame. Now add your name (I used Eye Candy 4000 - Gradient Glow & Glass plugins) and copyrights, save as .png file and you're finished!
Sunday, July 7, 2013
Another CT Tag Show-off!!
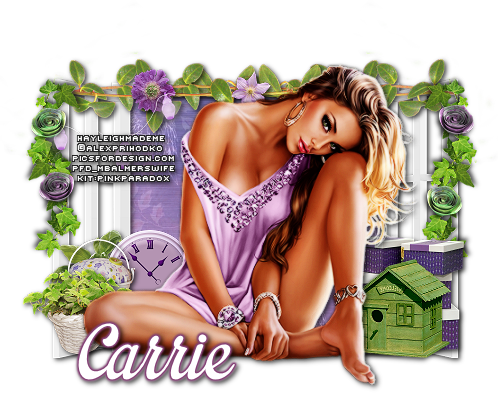
I have another CT tag show-off for you! This time I am using a kit by the wonderful PinkParadox and tube by Alex Prihodko. The kit is called "Lavender Fields" and the tube is called "Butterfly." Both can be purchased at PicsForDesign. Click HERE for the kit and HERE for the tube. Here's what I came up with:
CT Tag Showoff!!
I have a show-off I made using a kit from the great PinkParadox Productions. This kit is called "Clockwork Noir" and is inspired by Keith Garvey's new tube "Clockwork." You can purchase the kit at PicsforDesign and the tube at Garvey's tube store. Click HERE for the kit purchase and HERE for the tube. Here's what I came up with using the kit & tube:


Subscribe to:
Posts
(Atom)
About Me

- Hayleigh
- Oklahoma
- I'm a 30 year old SAHM to 3 adorable boys and newlywed to a wonderful husband. I've been using PSP for 9 years.
CU Licenses

Stamps