I CT For


Check 'Em!


My Blinkies!

Peaches Blog Train!

My Avatars (DO NOT SNAG)


Thursday, June 20, 2013
New PTU Tutorial "Fortune Teller"

This tutorial was written assuming you have a working knowledge of PSP. Any resemblance to another tutorial is purely coincidental.
Supplies:
:|: Tube :|:
I used a FTU tube by Anne Stokes.
:|: Kit :|:
I used a PTU kit from PinkParadoxProductions called "Gypsy Girl." You can purchase this kit from PicsForDesign.
:|: Template :|:
No template needed.
:|: Mask :|:
I used WSL_Mask223. You can get this mask from weescotslasscreations. Make sure you leave love when downloading.
:|: Fonts :|:
:|: Elements/Papers :|:
PPP-Gypsy Girl-E4
PPP-Gypsy Girl-E5
PPP-Gypsy Girl-E8
PPP-Gypsy Girl-E9
PPP-Gypsy Girl-E15
PPP-Gypsy Girl-E19
PPP-Gypsy Girl-E26
PPP-Gypsy Girl-E39
PPP-Gypsy Girl-E40
PPP-Gypsy Girl-E61
PPP-Gypsy Girl-E66
PPP-Gypsy Girl-E114
PPP-Gypsy Girl-P2
Let's get started!
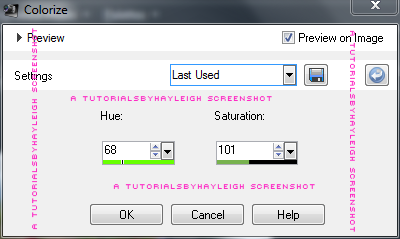
Open a new project (700x700 - transparent background). Copy/paste/resize/sharpen PPP-Gypsy Girl-E61. We're going to recolor the grass so it blends better with the muted colors of the other elements. I used the following settings:
Duplicate and mirror and situate the grass so it looks like one single row of grass. Copy/paste/resize/sharpen PPP-Gypsy Girl-E66 and position below the grass layer. Now open the rest of your elements, copy/paste/resize/sharpen and arrange on the tag as preferred...using my example to lead you if you like. Go ahead and add a dropshadow to all your element layers.
Open your preferred tube and resize/sharpen. Then add it to your tube below the grass layer but above the arch layer. Add a dropshadow to it. Copy/paste/resize/sharpen your paper layer and add it below the other layers but above your background layer. Layers - Load/Save Mask - Load Mask From Disk and select WSL_Mask223. Now add your name & copyrights & you're done! If you make a tag using this tutorial I'd love to see it!
Subscribe to:
Post Comments
(Atom)
About Me

- Hayleigh
- Oklahoma
- I'm a 30 year old SAHM to 3 adorable boys and newlywed to a wonderful husband. I've been using PSP for 9 years.
CU Licenses

Stamps

0 comments:
Post a Comment