My Licenses
MPT11646
CDO-4348
EAS14199
KG2666
PFD_mbalmerswife
PFD_6113
PTE0504
IRH3762A
SW5738
toosh2511
BHS-30
VMT_mbalmerswife
CI-4978-LM
SATC4343
AC1364
ZZT3579
C1018P
Powered by Blogger.
My Avatars (DO NOT SNAG)










Wednesday, March 26, 2014
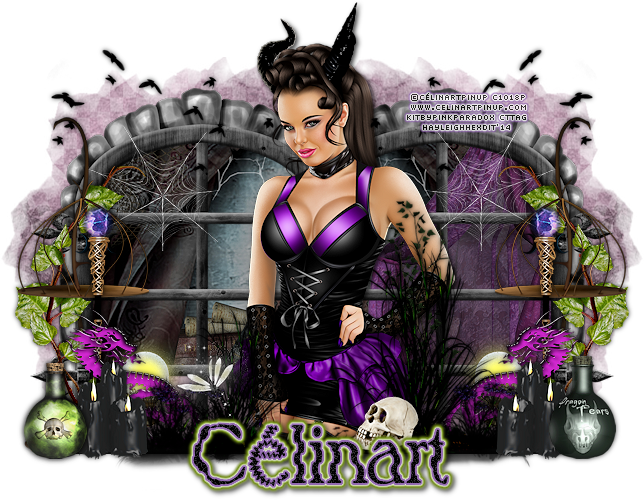
CT PTU Tutorial "Sleeping Beauty" Kit by PinkParadox & "Tina" Tube by Célinart Pinup
Supplies Needed:
Photo Editing Software: I am using Paint Shop Pro, but any editing software will work.
Kit: "Sleeping Beauty" by PinkParadox Productions; this is a PTU kit, do NOT share it.
Tube: "Tina" by Célinart Pinup; this is a PTU tube, do not use without proper license.
Mask: "WSL_Mask 220" by weescotslass.
Plugins: Xero - Radiance
Elements:
12*
14*
37*
38*
39*
45
47
58
69
73*
77*
79*
Papers:
1
26
Font: Pixelette (Copyright), Smokey SF (Name)
(Elements with a "*" beside them are duplicated & mirrored)
Let's get started!
Open up a new canvas (I always make mine 650 x 650 with transparent checked) and copy/paste element 73. Resize/sharpen it, mirror and duplicate and arrange side by side. Copy/paste your tube of choice, resize/sharpen and add Xero-Radiance. I usually press the "random" button until I get something I like =) Copy/paste/resize/sharpen paper "1" and place below the window layers, erasing any excess paper.
Now for the elements! Copy/paste your elements one at a time onto your canvas, feel free to use my tag as an example for placement. In the elements list I starred (*) the ones that I duplicated and mirrored! Now that you've gotten all your elements on there it's time for the mask. Copy/paste paper "26" and apply your mask. Resize/sharpen as you prefer and then I mirrored and duplicated. Go ahead and add your desired drop shadow to all your elements and tube. (For elements I use 0, 0, 75, 6.99, black & for the tube I use 2, 2, 75, 6.99, black).
Now add your name & copyrights and you're done! I love seeing anything you make with my tutorials so please feel free to post your creations below in the comments!!
This tutorial was written by me, Ruinations by Hayleigh, on March 26, 2014. It was made using my own imagination and any resemblance to another tutorial is purely coincidental. I wrote this tutorial assuming you have working knowledge of PSP. Please do NOT claim this tutorial as your own.

Subscribe to:
Post Comments
(Atom)
About Me

- Hayleigh
- Oklahoma
- I'm a 30 year old SAHM to 3 adorable boys and newlywed to a wonderful husband. I've been using PSP for 9 years.
TOU
All of my tutorials, tags & cluster freebies are from my own imagination. Any resemblance to other tutorials is purely coincidental. If using a cluster freebie for a challenge, please link back to my blog to download; and if you download anything be sure to leave love so I know someone's using them =)
Search
Blog Archive
-
▼
2014
(43)
-
▼
March
(16)
- CT Tags & Snags "Lakeside Retreat" Jackie's Jewels
- CT Tag Show-off "Queen of Hearts" by PinkParadox P...
- CT PTU Tutorial "Sleeping Beauty" Kit by PinkParad...
- FTU Cluster Frame "Summer Hideaway" PTU Kit by Jac...
- CT Tag Showoff "Summer Hideaway" Jackie's Jewels
- CT Tag Showoff "Pirate's Cove" PinkParadox Product...
- FTU Cluster Frame using PTU "Wish You Were Here" b...
- CT Tags & Snags "Wish You Were Here" Jackie's Jewels
- CT Tags "Endless Meadows" PinkParadox Productions
- FTU Cluster Frame "Spring in the Garden" Jackie's ...
- CT Tags & Snags "Spring in the Garden" Jackie's Je...
- CT Tags & Snags "Easter Fun" PinkParadox Productions
- CT Tag Showoff "Fresh & Fruity" PinkParadox Produc...
- CT Tags "Hint Of Spring" PinkParadox Productions
- PTU Tutorial "Purple Lady" PinkParadox and Céliart...
- CT PTU Tutorial "Sugar Sorbet"
-
▼
March
(16)
Labels
- Alehandra_Vanhek (1)
- Alex Prihodko (6)
- Amy Matthews (2)
- Anna Marine (2)
- Arthur Crowe (5)
- Barbara Jensen (1)
- Blog Layouts (1)
- Celinart (5)
- Célinart (8)
- Cluster Frame (11)
- Cluster Set (1)
- Crazy Babbelstubb (1)
- CT (90)
- DesignsBySarah (5)
- Di_Halim (2)
- Elias Chatzoudis (4)
- Ellie_Milk (2)
- Exclusive (1)
- Freebie (8)
- FTU (13)
- FTU kit (1)
- Halloween (1)
- How To (1)
- Jackie's Jewels (8)
- Jose Cano (2)
- Keith Garvey (2)
- My kits (3)
- New Releases (1)
- Ninaste (3)
- Peaches Blogtrain (1)
- PicsForDesign (4)
- PimpinPSPers Warehouse (6)
- PinkParadox (50)
- PinkParadox Productions Store (45)
- PSP Help (1)
- PSP Tut (3)
- PTU (55)
- PTU Tut (28)
- Request (2)
- Sale (6)
- Showoff (59)
- Snags (5)
- Tag Showoff (7)
- Template (4)
- Trinita (6)
- Tutorial (8)
- Verymany (14)
- Verymany match (3)
- Zlata Ma (1)
Chat With Me!
Stamps








0 comments:
Post a Comment