My Licenses
MPT11646
CDO-4348
EAS14199
KG2666
PFD_mbalmerswife
PFD_6113
PTE0504
IRH3762A
SW5738
toosh2511
BHS-30
VMT_mbalmerswife
CI-4978-LM
SATC4343
AC1364
ZZT3579
C1018P
Powered by Blogger.
My Avatars (DO NOT SNAG)



Wednesday, February 12, 2014
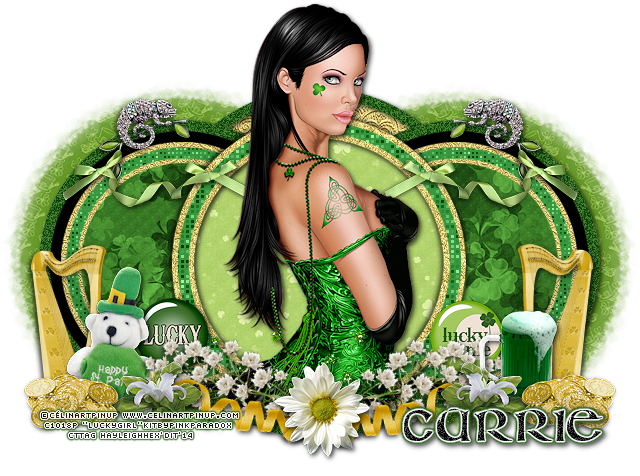
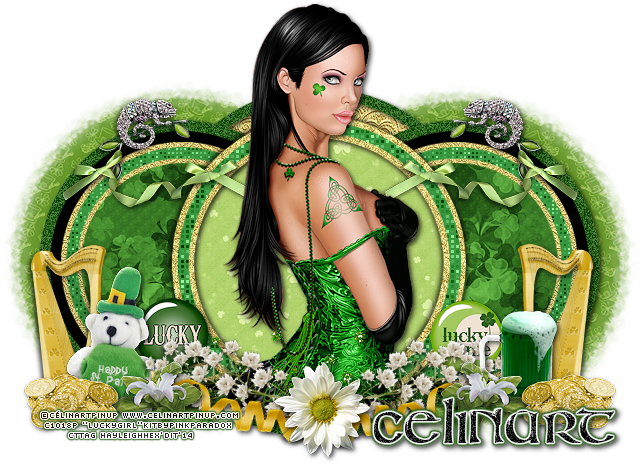
PTU Tutorial "Lucky Girl" kit by PinkParadox Productions & "Katty" tube by ©Célinart Pinup
Supplies Needed:
Photo Editing Software: I use Paint Shop Pro X3 but any version will work.
Kit: "Lucky Girl" by PinkParadox Productions; this is a PTU kit, please do NOT share.
Tube: "Katty" by Célinart Pinup; this is a PTU tube; do not use without proper license.
Template: "Pbs-Template150" by Punky Butts. Find the template HERE.
Mask: "WSL_Mask209" by weescotslass. Find the mask HERE.
Elements: 4, 5, 15, 18, 22, 41, 42, 49, 70, 73, 74, 76 & 80; Papers: 5, 7, 8, 9 & 10
Let's get started!
First open up your template and hit SHIFT + D to duplicate, then close the original file. Let's delete the layers we don't need. They are: PBS Credits, Fonts Used, Naughty List, Naughty List Frame, even has a wordart, even has a frame, You're the reason wordart, You're the reason frame, 2, 1 & dots leaving you with layers 3-17.
Highlight layer 3; open up paper 9, copy/paste onto canvas, resizing/sharpening and adding a dropshadow as you go. Erase any paper hanging out around the circle. Highlight layer 4; Selections -> Select All -> Float -> DeFloat. Add a new raster layer & flood fill frame selection with #2a611b; add noise of 40, monochrome & guassian checked then add a dropshadow.
Highlight layer 5; Selections -> Select All -> Float -> DeFloat. Add a new raster layer & flood fill frame selection with #2a611b; add noise of 40, monochrome & guassian checked then add a dropshadow. Repeat steps for layer 6. Leave layers 7 & 8 like they are. Highlight layer 9; copy/paste paper 9 and resize/sharpen, erasing any paper outside the circle. Repeat steps for layer 11.
Highlight layer 10; Effects -> Plugins -> Xero -> Fritillary with these settings: 5, 30, 48, 101. Repeat steps for layer 12. Highlight layer 13; open paper 7 and copy/paste to your canvas, resizing and sharpening so none shows outside the circle. Repeat these steps for layer 14. Highlight layer 15; open up paper 8 and copy/paste it to your canvas. Resize & sharpen so none shows outside the circle.
Highlight layer 16; open up paper 10 & copy/paste it to your canvas, resizing and sharpening so none pokes outside the circle. Add desired noise setting and dropshadow. Last is layer 17; add the preview Fritillary settings and a dropshadow. Now lets move on to the elements/tube!
Copy/paste/resize/sharpen your tube onto your canvas, placing the tube in the middle of the large center circle. Add any filters/dropshadow that you want. Open up your elements and place where desired (using my tag for reference if you like). I duplicated/mirrored layers 15, 41, 42, 49, 70 & 76. I free rotated layers 76 & 70 so they'd be sideways. Add a dropshadow to all element layers.
Open up paper 5 and place below everything but above any background layer you have. Apply your mask, resizing if needed. Place to the right so the mask shows just outside the circles & then duplicate & mirror it. Now just add your name & copyrights and you're done! Please feel free to send me any creations you make using my tutorial to mbalmerswifetuts@gmail.com.
This tutorial was written on 2/12/14 by me, Ruinations By Hayleigh, and is from my own imagination. Any similarity to another tutorial is coincidental. This tutorial was written assuming you have working knowledge of PSP. Do NOT claim this tutorial as your own!

Subscribe to:
Post Comments
(Atom)
About Me

- Hayleigh
- Oklahoma
- I'm a 30 year old SAHM to 3 adorable boys and newlywed to a wonderful husband. I've been using PSP for 9 years.
TOU
All of my tutorials, tags & cluster freebies are from my own imagination. Any resemblance to other tutorials is purely coincidental. If using a cluster freebie for a challenge, please link back to my blog to download; and if you download anything be sure to leave love so I know someone's using them =)
Search
Blog Archive
-
▼
2014
(43)
-
▼
February
(8)
- CT Tags & Snags "A Kiss for Luck" PinkParadox Prod...
- Amazing Kits From PinkParadox Productions On Sale ...
- CT Tags & Snags "Beware the Wolf" kit by PinkParad...
- CT PTU Tutorial "Gothic Mermaid" kit - PinkParadox...
- PTU Tutorial "Lucky Girl" kit by PinkParadox Produ...
- CT Tag Show-off "Spring Fantasy" PinkParadox Produ...
- **New Releases from PinkParadox Productions!!!**
- CT Tag Show-off "Lost In Wonderland" PinkParadox P...
-
▼
February
(8)
Labels
- Alehandra_Vanhek (1)
- Alex Prihodko (6)
- Amy Matthews (2)
- Anna Marine (2)
- Arthur Crowe (5)
- Barbara Jensen (1)
- Blog Layouts (1)
- Celinart (5)
- Célinart (8)
- Cluster Frame (11)
- Cluster Set (1)
- Crazy Babbelstubb (1)
- CT (90)
- DesignsBySarah (5)
- Di_Halim (2)
- Elias Chatzoudis (4)
- Ellie_Milk (2)
- Exclusive (1)
- Freebie (8)
- FTU (13)
- FTU kit (1)
- Halloween (1)
- How To (1)
- Jackie's Jewels (8)
- Jose Cano (2)
- Keith Garvey (2)
- My kits (3)
- New Releases (1)
- Ninaste (3)
- Peaches Blogtrain (1)
- PicsForDesign (4)
- PimpinPSPers Warehouse (6)
- PinkParadox (50)
- PinkParadox Productions Store (45)
- PSP Help (1)
- PSP Tut (3)
- PTU (55)
- PTU Tut (28)
- Request (2)
- Sale (6)
- Showoff (59)
- Snags (5)
- Tag Showoff (7)
- Template (4)
- Trinita (6)
- Tutorial (8)
- Verymany (14)
- Verymany match (3)
- Zlata Ma (1)
Chat With Me!
Stamps






0 comments:
Post a Comment